So I started the process of cutting and molding the PVC this weekend. This was at times hilarious and fracking frustrating. (there may have been times where we set a couple things on fire as well) However the end product came out surprisingly wonderful and we had a good start at it.

Initially there were patterns that had to be cut from art paper and shaped to my body. We then took those patterns and laid themover the top of the PVC sheet and traced it with permanent ma rker. This gave us the outline to be able to cut it. We tried a dremel at first but the heads kept on shattering and melting the plastic. So instead we used a jigsaw with a scroll blade. Success! It was easy from there to cut out the patterns. Now here’s a lesson…I measured the patterns to be exact with no room for what happened to the PVC when heated. That would be shrinkage. No one told me that the plastic shrinks slightly when heated, or if heated too much shrinks like a shrinky dink (for those of you old enough to remember these). Now the PVC can be reheated over and over to try and mold it to what you like. We just had to make sure it wasn’t too much and that we didn’t ruin the parts that came out correctly. The oven was at 375 for a long time before we realized that was just too hot. 325 seemed to be the ideal temperature. We needed to use Ovegloves to be able to handle the hot pieces. They are HOT!

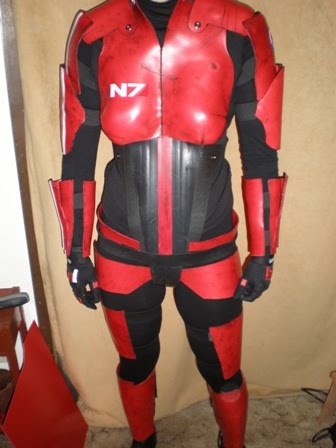
We started with the chest plate. At first this was a disaster and after and hour and a half I thought that it was just not going to work at all. It didn’t stretch like we thought and wrinkled and bubbled at the round points. Cue horror music. After re-cutting a larger piece and trying again nothing seemed to be working. The two of us then employed the help of two other friends to apply pressure to the plate while it was on me and I was pinned up against a wall, so that the whole thing would get shaped at once instead of in stages. Bingo! That was the problem. We just needed two more sets of hands to make it work. So a set of hands on each side and one wrapped around my neck to make the collar. Talk about claustrophobic. After almost passing out from lack of oxygen the piece got done and looked incredible. It now needs to be cut around the edges and sanded down to the appropriate shape. The pic is not the final product, I knew you were worried. This was by far the most complicated and hardest piece to make so with that out of the way the rest seemed to fly by.

We managed to get all three of the forearm pieces (three on each side) done as well as the shoulders. there is still one more piece for the upper arms to get done and well as the back plate. Here’s another note. Just wearing a shirt does not protect you from the heat of the plastic no matter what people say about the thermodynamics of how it distributes the heat. It will burn you. As it did me. On the bottom pieces of the forearm, when applied with pressure to the arm, it felt like it was burning it’s way through to the other side. Now cue bright red arm and lots of cursing. But it got done and looked fantastic at the end.
On a side note, when we tried to spot heat the pieces over a gas flame on the stove we managed to set the piece on fire, which by the way looks really cool, and what was produced was a very toxic fume that is not fun to smell at all. So be careful!
I then worked on the ab plate and the cod piece. The ab plate is made out of rubber, so that I am able to bend at the waist, as well as the cod piece. The top and bottom will be cheated together via a strap that goes around the waist to the back and can be detached. This is for the ability to be able to remove it quickly for those most important bathroom breaks. The white plastic piece in the middle is used to join the two pieces together via a poxy and will be painted later. The cod piece still needs to be cut and shaped so it will run from the groin through the legs and up to the low back.
Now all of this will be attached to a suit via Velcro strips for easy removal and the ability to move it around if needed and once placed will stay where it needs to be. Have to sand and paint and color and…There is still so much to do and so very little time to do it in. Next will be the back plate, the top of the upper arm pieces and the holsters for the rifles that attach to the back. GAH! better get to work


 The worst part of this whole process was, and is, trying to figure out how to attach the armor to the clothes. Because everything is so fitted I have to be able to take the pieces on and off to get in and out of it. Hey, I know, lets try sticky Velcro. I should have just poured more hot glue on my fingers and called it a day. It sticks to the plastic but not to the shirt. So how do you know where to place it on the shirt to be able to sew it on if it doesn’t stay on the shirt blah blah blah. Well kind of figured out how to do that with paint marking on certain parts to mark the shirt when placing it. But then the sewing comes in. Oh for fracks sake. Trying to sew through the sticky Velcro is a nightmare. I suppose I could take the next 15 years and try to hand sew it or just use a machine. Not as easy as you would think. Needle gets stuck, screws up stitch. Again with the blah blah blah. All I have to say is I wish that I wasn’t so concerned about the cosmetics of straps and buckles to attach t his thing to me. So I’m going to continue to make it difficult on myself and try to get through this whole sewing thing. I don’t have much time so back to work!


